How to make a cladogram? Creating a cladogram is an essential skill in biology, allowing scientists to represent and understand the evolutionary relationships between different species visually. This tutorial will review the steps necessary to construct a cladogram clearly and concisely.
Cladograms are simplified tree-like diagrams used by scientists to show the evolutionary history of organisms. They highlight similarities and ancestry through common traits, demanding precision as each branch and node represents an evolutionary relationship.
Throughout this guide, we will delve into the intricacies of making a cladogram and provide practical tips to ensure that the resulting diagram effectively conveys the evolutionary history of the chosen species.
Whether you are a seasoned biologist or a curious student, mastering the art of cladogram construction is a valuable skill for understanding the diverse web of life on Earth.
Source Pinterest
How to Make a Cladogram?
Following are the top DIY Cladogram Plans:
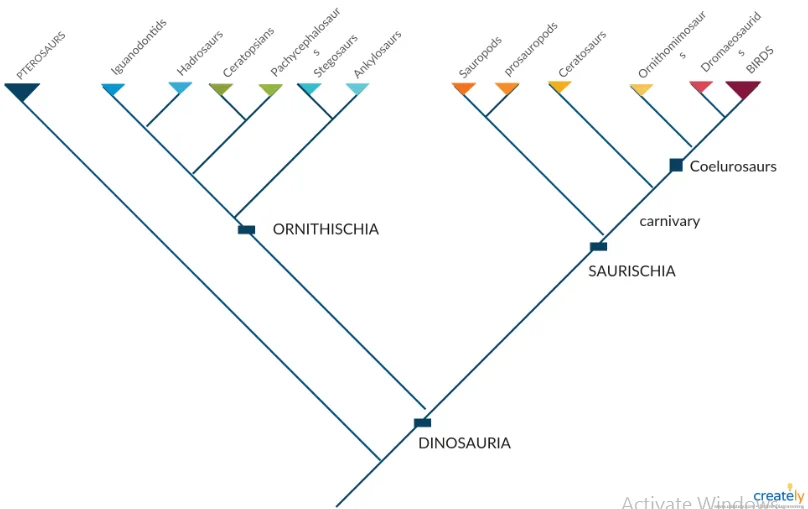
1: Colorful Cladogram
Source Pinterest
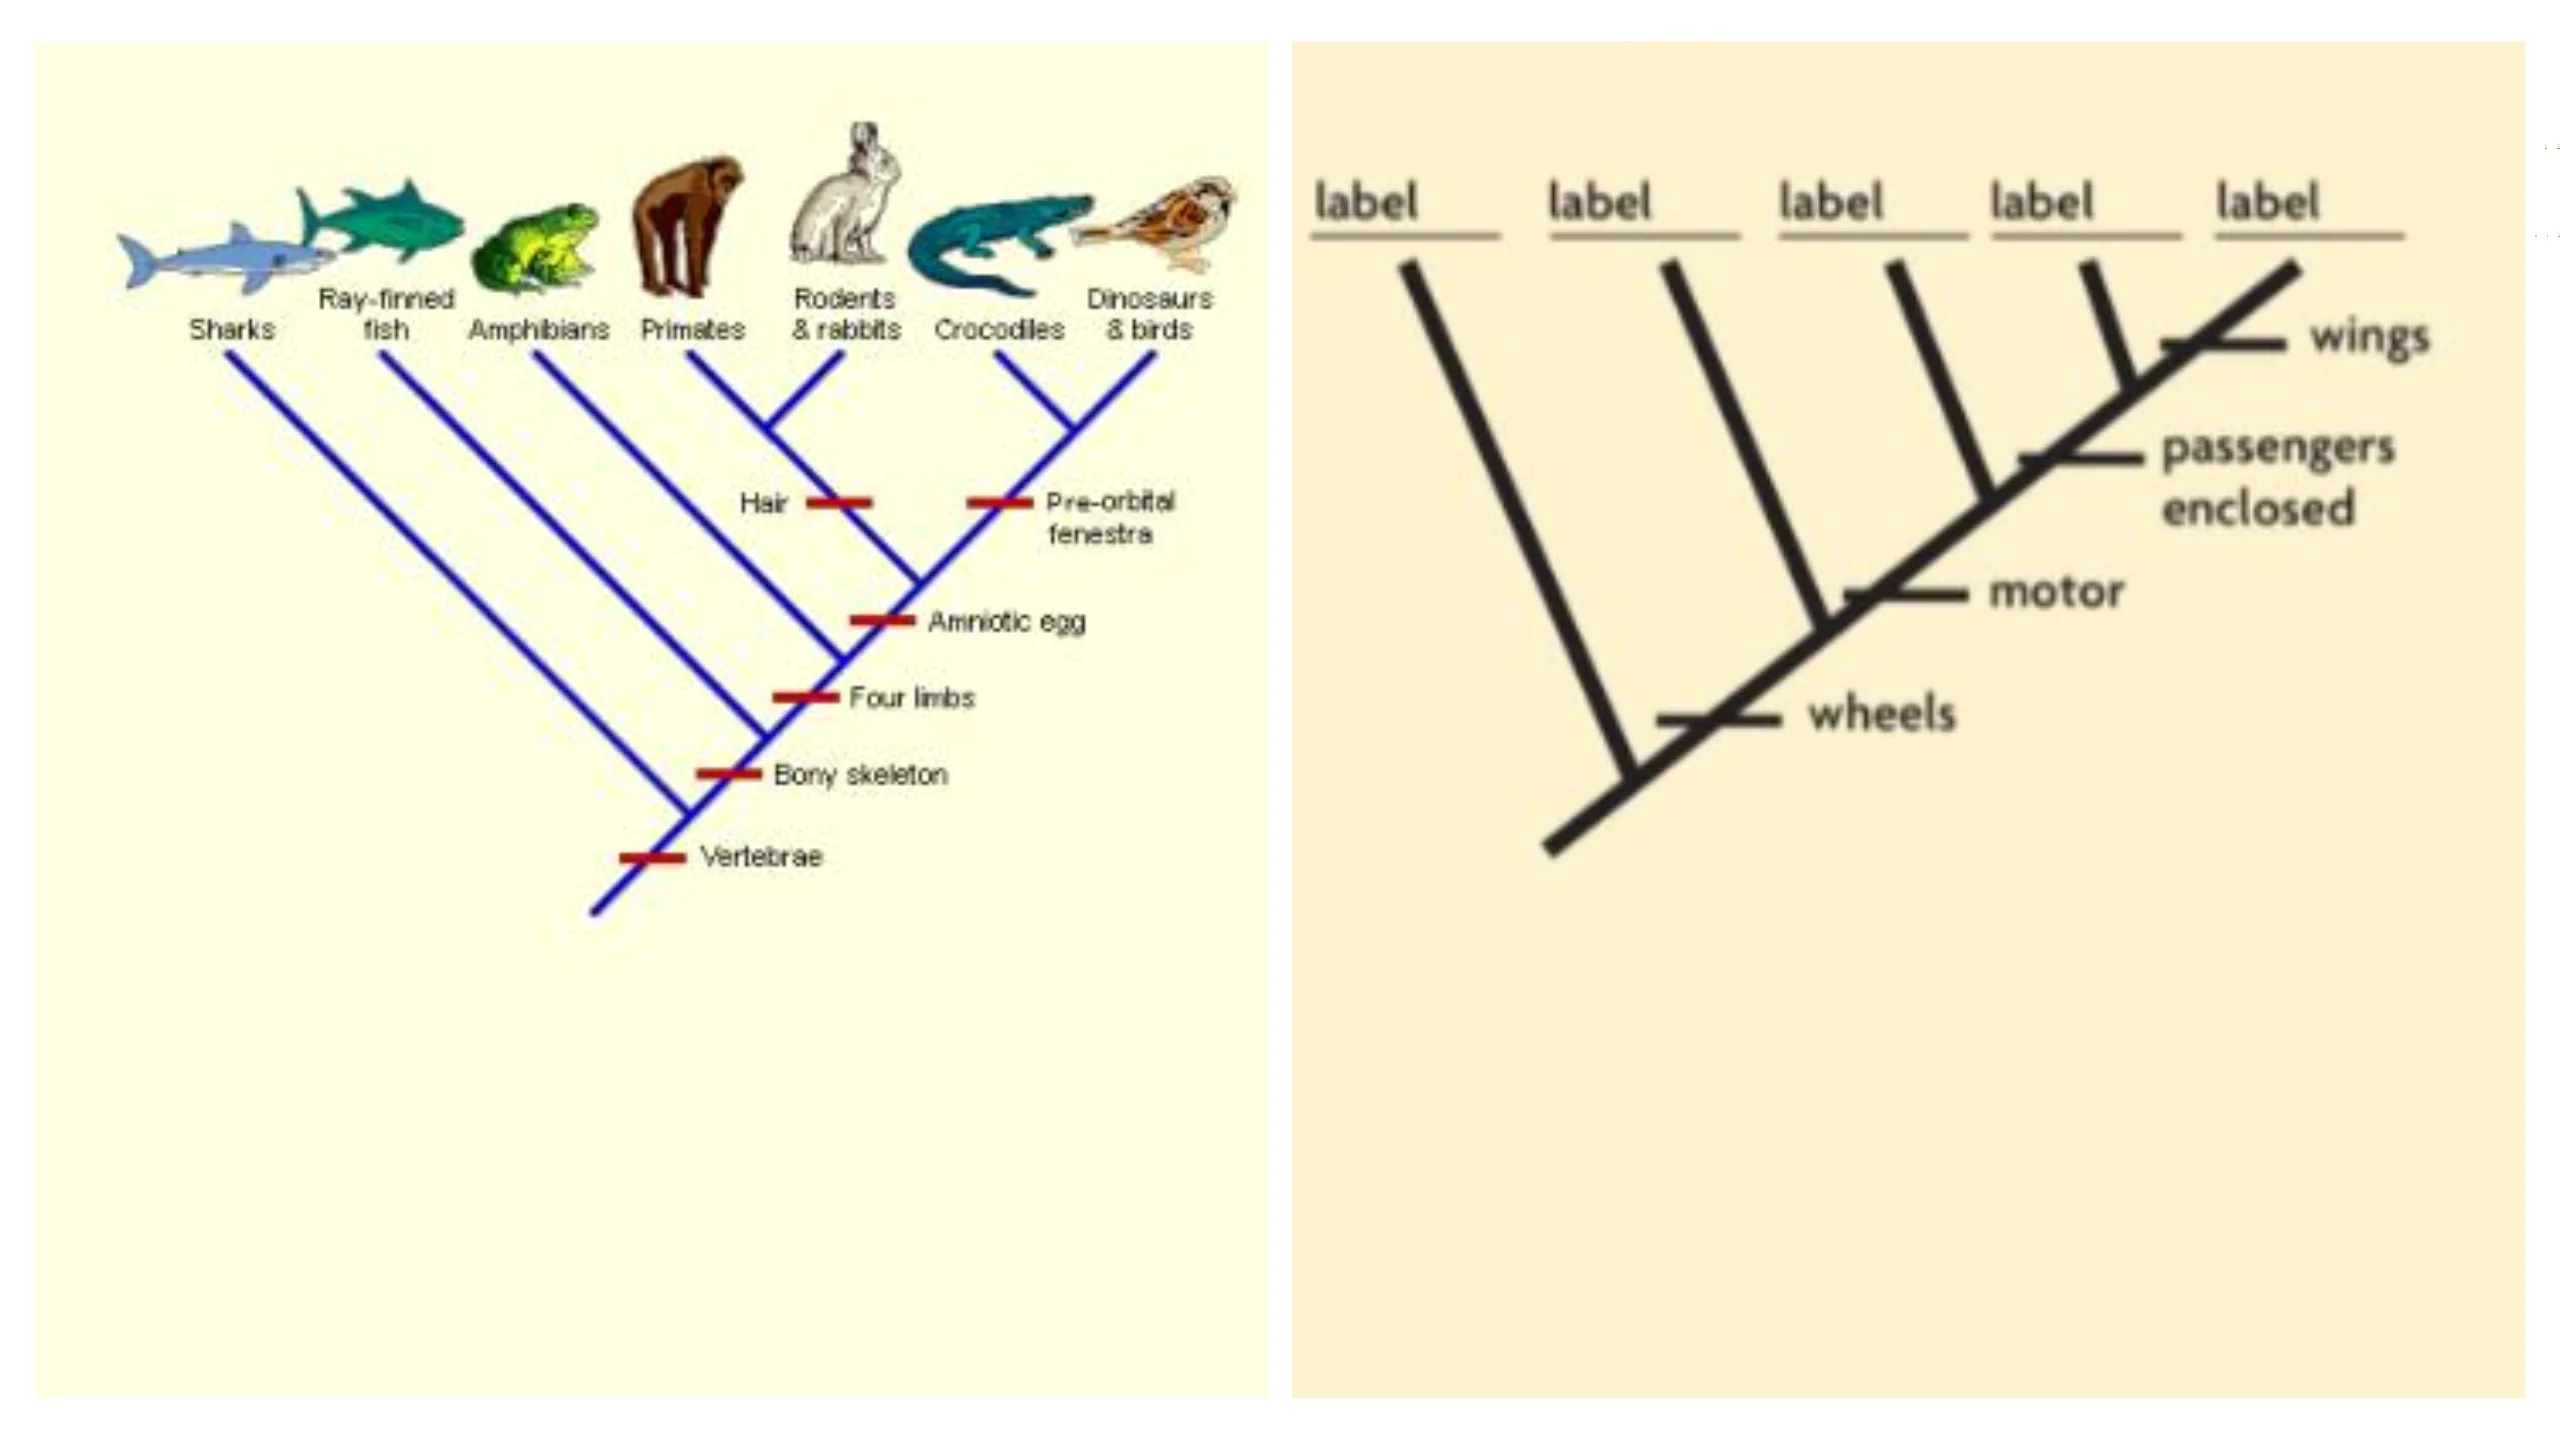
A cladogram is a simplified diagram scientists use to understand the evolutionary relationships between species. Unlike complex phylogenetic trees, cladograms are easy to read and comprehend.
To create a colorful cladogram, identify species and their shared characteristics and then arrange them to show shared ancestry.
Utilize color coding to enhance visual clarity and boldly label species and key nodes. While it simplifies complexity, cladograms remain a useful scientific tool for studying evolutionary history.
They offer a user-friendly way to explore the connections between species, making it valuable for both researchers and learners.
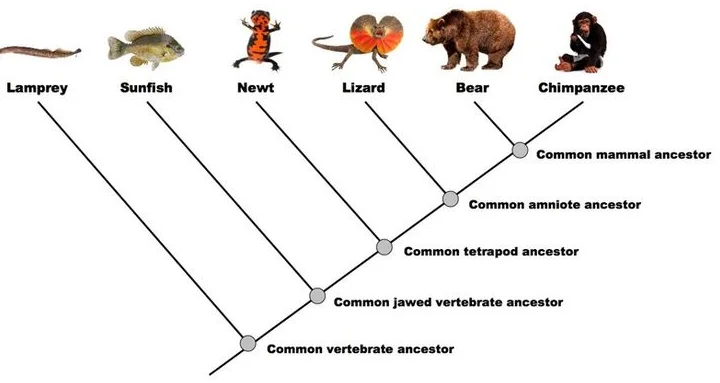
2: AP Science Style Cladogram
Source Pinterest
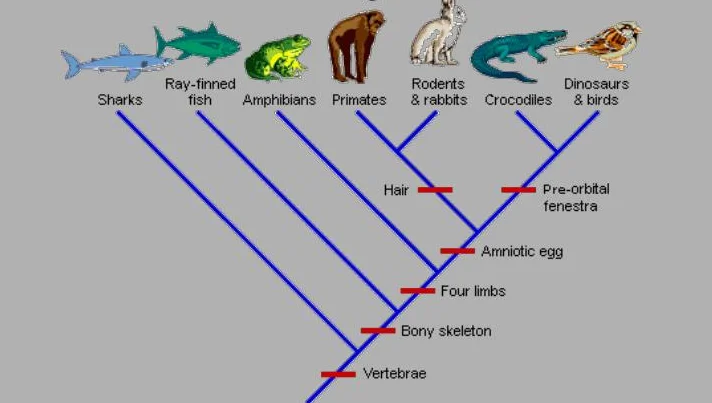
You can construct your very own animal family tree using a cladogram. A cladogram is a graphic that illustrates the evolutionary connections between various kinds of animal species.
You can make one by compiling material from various sources, including books and internet databases. You may learn about the evolutionary history of various species and better understand how those species are linked to one another if you make your cladogram.
3: Excel-Style Cladogram
Source Pinterest
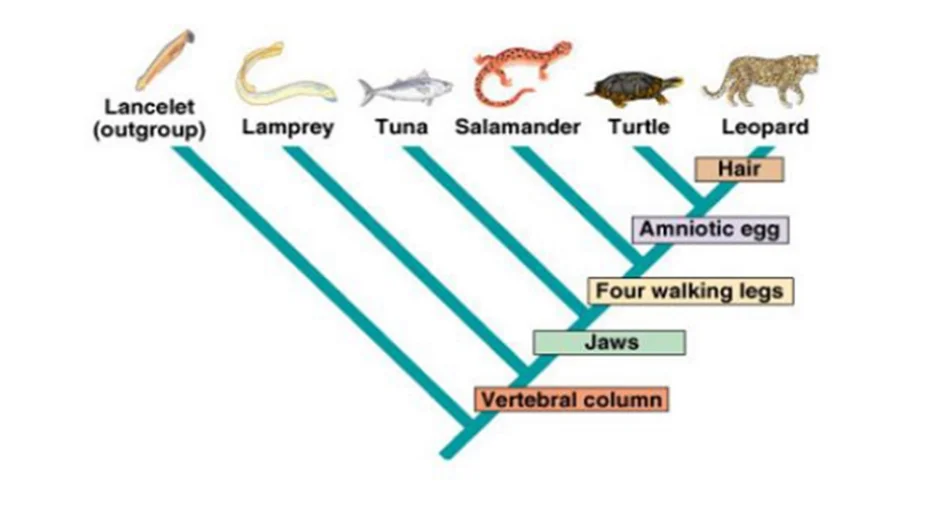
A cladogram is a graphic used to depict the evolutionary link between various species. Cladograms are often used to identify how closely several species are related to one another. In addition, one may use them to determine whether species groups have a common ancestor.
For scientists to generate a tree-like diagram called a cladogram, they employ genetic data or physical traits as their building blocks. If two species are located near one another on the cladogram, their relationships are more closely connected.
Step-by-Step Guide to Creating a Cladogram
Step 1: Gather Materials

Source Pinterest
You’ll need the following:
A computer with internet access and the ability to use Google Images
Access to this provided template.
Before you begin, let’s clarify some essential terms:
Species: In phylogenetics, species are populations of organisms capable of interbreeding and producing fertile offspring.
Phylogeny is the evolutionary history of a group of organisms or taxa, depicting their relationships based on available data.
Cladogram: A cladogram is a phylogenetic tree illustrating the evolutionary history and relationships among organisms.
Step 2: Creating the Cladogram
Source Pinterest
To make a cladogram, you have two options: manual creation or using an online tool. We recommend the user-friendly and free online program Draw Bot, as it’s browser-based, eliminating the need for downloads.
Other alternatives include PHYLIP and Mesquite. Here’s a step-by-step guide on how to create a cladogram using Draw Bot:
Open the Template: Begin by opening the provided template. In Draw Bot, you can upload an image of your choice by clicking “Choose File” and then dragging and dropping your image into the workspace. Adjust image transparency using the slider at the top right.
Layer Setup: Create three essential layers for taxa names, inter-taxon edges (branches), and tips (terminal nodes). The first layer serves as a legend/key, and the second builds the branches, and the third labels each branch.
Layer Naming: Name your layers appropriately. In Layer 1, enter the taxa names by typing them into the text box at the top left. You can use Draw Bot’s 3D Controls to adjust the placement of your text by clicking on Layer 1.
Branch Labeling: Label each branch on your cladogram by typing the branch names into Layer 2. Drag and drop branches as needed, using 3D controls to fine-tune their positions. Finally, add the names of your terminal nodes (tips) in Layer 3.
Saving and Sharing: Once your cladogram is complete, you can easily incorporate it into your publication, presentation slide, research paper, and more. Copy and paste each layer into an image editor like Microsoft PowerPoint or Adobe Illustrator.
Legend Inclusion: Ensure you provide a legend, so others can understand the meaning of your cladogram. Add taxa names and their evolutionary relationships in Layer 1, following a clear and non-redundant order.
Save Your Work: Remember to save your final product. Once saved, you can share it with your lab supervisor or use it for publication.
Step 3: Interpreting the Results
Sometimes, your cladogram may appear puzzling, so it’s crucial to grasp what a phylogenetic tree signifies – how a group of organisms relates to the “tree of life.”
Cladogram Economy: Understand that a cladogram represents the most efficient solution for a given set of taxa. In essence, it shows the evolutionary history with minimal changes.
It doesn’t present all potential scenarios of lineage determination from a common ancestor; it illustrates how each species is most likely related to one another.
Polytomies: If multiple branches lead to an unresolved polytomy (where multiple equally parsimonious options exist for determining relationships among taxa at the branch tips), you should question why this occurs.
It might be due to different subgroups within a species with slight variations that challenge precise determination (e.g., distinguishing characteristics like a nose stud’s location). Keep in mind that there are gaps in our understanding of evolutionary relationships.
Labelling Tips: Ensure that the tips on your cladogram are labelled with common names. You can also use scientific names (genus and species) for accuracy. When using scientific names, remember to italicize or underline them (e.g., “Xenopus laevis”).
Note that “Xenopus laevis” specifically refers to the type specimen, and specimens within a species can vary. Additionally, italicize or underline the names of the taxa being compared.
Common Names: While common names are useful, they may not be necessary for lab-related projects. Using scientific names is acceptable if you need clarification on the common name.